How to Build Your First Astrophotography Rig
By DeepField Editorial Team · 12 min read · Updated June 2026
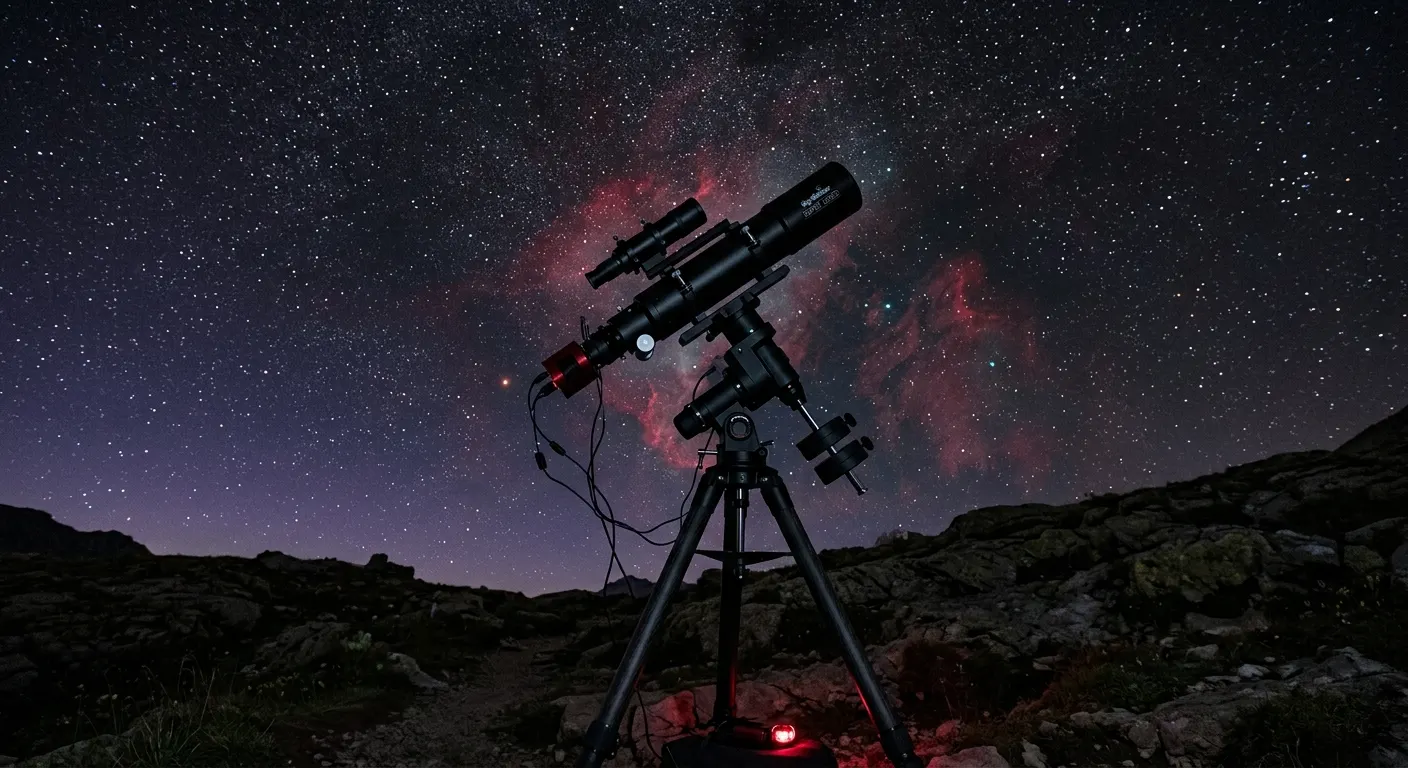
Building a first astrophotography rig is one of those decisions where buying in the wrong order costs real money. The most common mistake is spending on a telescope first and skimping on the mount, then discovering that a wobbly mount ruins every frame no matter how good the optics are. The correct order is mount, then camera, then telescope, then autoguiding. Start with the Sky-Watcher EQ6-R Pro GoTo Equatorial Mount if you want a single answer for a mid-sized rig, or the ZWO AM5N Harmonic Drive Equatorial Mount if portability matters more than anything else. Here is how to assemble a working deep-sky setup from scratch.
Quick answer
Start with a rigid mount before buying a telescope. The Sky-Watcher EQ6-R Pro is the community default for a mid-sized first rig, pairing a 44 lb payload with belt-drive tracking and native PHD2 compatibility. Add a ZWO ASI220MM Mini guide camera and a 30 mm mini guide scope and you have a complete guided imaging system for under $2,000.
This guide contains affiliate links. DeepField may earn a commission at no cost to you.
Step 1: Choose the mount first, everything else follows
The mount determines what telescope you can use, how long your exposures can be, and whether you need autoguiding. A mount rated at 40 lbs is safely used at 20 to 24 lbs of imaging load, which covers a typical 80 mm refractor, camera, guide scope, and accessories. Overpacking a mount increases periodic error and motor strain.
For a first serious deep-sky rig, the Sky-Watcher EQ6-R Pro GoTo Equatorial Mount is the community benchmark. Its belt-drive system eliminates the gear backlash that plagues budget mounts, and the SynScan GoTo protocol works natively with PHD2 and NINA without any hacks or adapters. At 44 lbs of rated payload, it comfortably carries a mid-sized refractor and a full accessory train.
If you plan to image from a car park, a rooftop, or while traveling, consider the ZWO AM5N Harmonic Drive Equatorial Mount instead. Its harmonic drive carries 28 lbs without a counterweight, which means the whole system weighs significantly less on the road. The trade-off is price: the AM5N costs a few hundred dollars more than the EQ6-R for similar payload.
Budget a step lower? The iOptron CEM26 Center-Balanced Equatorial Mount and the Celestron Advanced VX GoTo Equatorial Mount are both capable mid-payload mounts that can run autoguiding successfully. Neither matches the EQ6-R on periodic error or belt-drive smoothness, but both produce good guided images when properly polar-aligned.

Sky-Watcher EQ6-R Pro GoTo Equatorial Mount
The community default for mid-payload deep-sky imaging: belt-driven, 44 lb capacity, SynScan GoTo, and rock-solid long-exposure tracking that works with PHD2 and NINA out of the box.
ZWO AM5N Harmonic Drive Equatorial Mount
A compact harmonic-drive GoTo mount that carries 28 lbs without a counterweight, weighs only 12 lbs, and delivers sub-10 arcsecond periodic error straight from the factory.
iOptron CEM26 Center-Balanced Equatorial Mount
A center-balanced EQ mount with 26 lbs capacity, AccuAlign polar scope, and a smart controller, designed with a low center-of-gravity that improves tracking stability over a standard GEM.
Step 2: Set up polar alignment before doing anything else
Polar alignment is the foundation of every long-exposure image. A poorly polar-aligned mount makes autoguiding fight a constant uphill battle, introduces field rotation in longer exposures, and makes plate-solving less reliable. Get this right before worrying about anything else.
The EQ6-R and CEM26 include polar scopes for visual drift alignment, which is fast once you practice it. For a more precise result, NINA and SharpCap both include software polar-alignment routines that use plate-solving on short drift exposures to guide you to within a few arcseconds without needing to see Polaris in a polar scope.
The ZWO ASIAIR Plus 256GB Wi-Fi Imaging Controller has a polar-alignment routine built into its phone app that works particularly well for beginners because it shows you exactly which direction to move the altitude and azimuth knobs with live feedback. For a portable rig where setup time matters, this removes a major friction point from the first night routine.

ZWO ASIAIR Plus 256GB Wi-Fi Imaging Controller
An all-in-one Raspberry Pi-based imaging controller that connects ZWO cameras, a GoTo mount, EAF autofocuser, and guide camera through a single device controlled from a phone app, eliminating the laptop entirely.
Step 3: Add autoguiding for multi-minute exposures
Without autoguiding, even the best belt-drive mount drifts noticeably over two to three minutes at focal lengths above 500 mm. Autoguiding corrects those small errors in real time, letting you stack four to ten minute exposures that collect far more signal per frame.
The simplest first autoguiding setup is a ZWO 30mm f/4 Mini Guide Scope paired with a ZWO ASI220MM Mini Guide Camera running PHD2. The guide scope weighs under 200 grams, so it barely affects mount balance, and the ASI220MM Mini's sensitive IMX220 monochrome sensor finds guide stars quickly. This combination runs under $300 and works seamlessly with both the ASIAIR and a laptop running PHD2.
For tighter star fields or longer focal lengths above 1000 mm, a ZWO OAG-L Off-Axis Guider eliminates the differential flexure between the guide scope and the main optical path that causes one-directional star trails over long exposures. The OAG uses a prism inside the main light path so the guide camera and the imaging camera always point at exactly the same stars.
If you are stepping up from a mini guide scope, the SVBONY SV165 60mm Guide Scope with Helical Focuser gives you 60 mm of aperture for a much larger pool of guide stars in sparse Milky Way fields, at still very modest cost.

ZWO 30mm f/4 Mini Guide Scope
A compact 30 mm f/4 guide scope weighing under 200 grams that pairs directly with ZWO guide cameras and mounts with a standard dovetail foot.
ZWO ASI220MM Mini Guide Camera
A sensitive monochrome guide camera with a Sony IMX220 sensor and native USB-C, designed as the primary guide camera in the ZWO ASIAIR and PHD2 ecosystems.
ZWO OAG-L Off-Axis Guider
An off-axis guider that inserts between the imaging telescope and camera to pick off a guide star from the main optical path, eliminating differential flexure at long focal lengths.
SVBONY SV165 60mm Guide Scope with Helical Focuser
An affordable 60 mm aperture guide scope with a helical focuser and mounting rings, delivering more guide star options than a 30 mm mini scope at a very low price.
Step 4: Control everything from one device
A laptop running NINA is the most flexible way to control a deep-sky rig, but it adds cables, weight, and complexity. For a first rig, the ZWO ASIAIR Plus 256GB Wi-Fi Imaging Controller is a much more approachable starting point. It connects your ZWO camera, mount, guide camera, and electronic autofocuser through a single device controlled from a phone app, handling polar alignment, plate solving, guiding, and autofocus in one place.
Once you outgrow the ASIAIR or want more scripting power, the Pegasus Astro Pocket Powerbox Advance Gen2 is a compact smart power hub that distributes regulated 12V power to every device in the rig from a single cable, with per-channel software control. This is the accessory that replaces the tangle of extension cords and power strips that plague every first rig.
ZWO ASIAIR Plus 256GB Wi-Fi Imaging Controller
An all-in-one Raspberry Pi-based imaging controller that connects ZWO cameras, a GoTo mount, EAF autofocuser, and guide camera through a single device controlled from a phone app, eliminating the laptop entirely.
Pegasus Astro Pocket Powerbox Advance Gen2
A compact field power hub with four 12V outputs, USB 3.0 ports, and a built-in dew heater controller that gives you smart power management in a pocket-sized box for travel rigs.
Step 5: Add an electronic autofocuser once you are tracking cleanly
Focus shift is real. As a telescope cools over a four-hour session, the focal point moves noticeably, softening stars. An electronic autofocuser lets NINA or the ASIAIR app refocus automatically on a schedule without interrupting the session.
The ZWO EAFN Electronic Automatic Focuser (2025) is the standard first choice for ZWO ecosystem setups. It carries 5 kg of camera and accessories, connects via USB-C for a single cable, and triggers autofocus routines on a temperature threshold or time schedule. For imagers who want to manually jog focus at the telescope without a connected device, the ZWO EAF Pro Electronic Autofocuser adds built-in buttons and a rechargeable battery at a modest premium.
ZWO EAFN Electronic Automatic Focuser (2025)
A fifth-generation electronic autofocuser with a 5 kg load capacity, USB-C connection, and native ASIAIR and NINA support, allowing software-driven automatic focus routines during an imaging session.
ZWO EAF Pro Electronic Autofocuser
An upgraded autofocuser with built-in manual focus buttons, a USB-C port, and a rechargeable internal battery, adding the ability to manually jog focus at the telescope without a connected device.
Featured in this guide
Sky-Watcher EQ6-R Pro GoTo Equatorial Mount
The community default for mid-payload deep-sky imaging: belt-driven, 44 lb capacity, SynScan GoTo, and rock-solid long-exposure tracking that works with PHD2 and NINA out of the box.
ZWO AM5N Harmonic Drive Equatorial Mount
A compact harmonic-drive GoTo mount that carries 28 lbs without a counterweight, weighs only 12 lbs, and delivers sub-10 arcsecond periodic error straight from the factory.
ZWO ASI220MM Mini Guide Camera
A sensitive monochrome guide camera with a Sony IMX220 sensor and native USB-C, designed as the primary guide camera in the ZWO ASIAIR and PHD2 ecosystems.
ZWO 30mm f/4 Mini Guide Scope
A compact 30 mm f/4 guide scope weighing under 200 grams that pairs directly with ZWO guide cameras and mounts with a standard dovetail foot.
ZWO ASIAIR Plus 256GB Wi-Fi Imaging Controller
An all-in-one Raspberry Pi-based imaging controller that connects ZWO cameras, a GoTo mount, EAF autofocuser, and guide camera through a single device controlled from a phone app, eliminating the laptop entirely.
Related roundups
FAQ
Frequently asked questions
What should I buy first for deep-sky astrophotography?+
Buy the mount first, before the telescope or camera. The mount is the foundation everything else sits on, and a wobbling or high-periodic-error mount ruins every frame regardless of how good the optics are. The Sky-Watcher EQ6-R Pro is the community default for a mid-sized first rig, with a 44 lb payload, belt-drive tracking, and native PHD2 compatibility.
Do I need autoguiding for my first astrophotography setup?+
For focal lengths under 500 mm and exposures under two minutes, a well-polar-aligned belt-drive mount can sometimes work without guiding. In practice, almost all serious deep-sky imagers add autoguiding, because it extends usable exposure time to four to ten minutes and corrects the small tracking errors that accumulate over longer subs. A mini guide scope and guide camera add under $300 and make a large difference.
Is the ZWO ASIAIR good for beginners?+
Yes. The ASIAIR is one of the most beginner-friendly entry points into automated deep-sky imaging because it handles polar alignment, plate solving, guiding, and capture from a single phone app without a laptop. The trade-off is that it is best suited to ZWO cameras and mounts. If you run non-ZWO hardware or want maximum scripting flexibility, a mini-PC running NINA gives more headroom.
How much should I budget for a first deep-sky imaging rig?+
A capable first rig including a mid-payload GoTo mount, an 80 mm refractor, a dedicated imaging camera, a guide scope and guide camera, and a basic imaging controller runs between $3,000 and $5,000 depending on choices. The mount alone should account for at least a third of that budget. Skimping on the mount to buy a better telescope is the most common and most expensive mistake first-time imagers make.